How To - Using Epoxy Clay for Filling and Setting a Cameo in an Open-backed Frame
Over on Facebook there's a group,B'sue Boutiques Creative Group, that I have followed for some time as a regular customer of B'sue. Lately I've posted a few times for their Work Table Wednesday (WTW) and Finish Up Friday (FUF) features.
In today's WTW I mentioned that I was going to use epoxy clay (Crystal Clay) for one of the pieces on the worktable and a commenter mentioned she'd not used it before. Well, I haven't used it much myself, mostly experimental things (that didn't quite work out!).
One piece that I did use it on successfully is a pendant I recently completed and listed. The setting is an open oval with flowers at the bottom and the cameo didn't quite fill the entire space at the bottom of the setting, so I pressed in an oval of black Crystal Clay which not only filled in the space at the bottom but also made the setting absolutely secure. That cameo won't be falling out of the setting short of total destruction.

I thought this might be an opportunity to show how I set the cameo in an open frame with Crystal Clay. It was pretty simple.
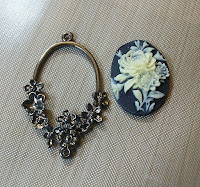
Here's an example of the frame and a floral cameo the same size as the skeleton lady. The frame was from Dry Gulch beads, but I didn't find it there in a cursory search. I've had the cameo in my stash for a long time, but they're not hard to locate around the web. Since I mentioned B'sue above be sure to check her site first!

See the small gap at the bottom where the table shows through? Also, the frame isn't very thick and the chance of a glued cabochon or cameo falling off would be pretty high. I decided to try using my Crystal Clay to secure the cameo and also fill in the gap.

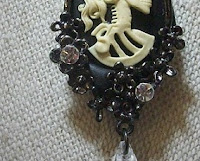
I followed the directions to mix the two part epoxy clay using enough to create an oval that would cover the entire back of the frame and cameo then I pressed the pieces into the oval to secure them. I left the entire thing to dry for 24 hours.

If you look at the lower left of the cameo you can see a little puff of the Crystal Clay. The whole piece is only a couple inches long so it's barely noticeable.
Various varieties and colors of epoxy clay are on the market and as a bonus, the clay once set takes paint, Gilder's Paste, Rub n Buff and probably a lot of other products so if you need a good color match you should be able to touch up the clay fairly easily after it's set.
Have you tried anything like this? I'd love to hear about it!
~Dawno~
posted by ohdawno at
8:51 PM
0 Comments
![]()
![]()