
Learning to do Off Loom Bead Weaving
Since I enjoy loom bead weaving so much, I thought I'd try to do some off loom weaving. For my first attempt I bought the components as a kit from Fusion Beads (except for the Silkon thread and the #12 beading needle I already had) and followed the instructions online. I did have to pick a different color than the one in the project directions as they were out of stock on the lovely 6mm Ruby Lila Vega Luster 2 Hole Honeycomb Jewel Czech Glass Bead.
The pattern works vertically from bottom to top (for the most part) and since the hex beads are two hole there are some interesting twists and turns involved. It amazes me how anyone figures these patterns out from scratch - at least for now, since I'm a bare novice. There has some kind of calculus or algorithm, I'm certain, to finding the best possible path!
I'm pretty happy with the outcome, though - the pattern instructions were very well written, easy to follow. I've only finished one of the set that's meant for earrings because I'm thinking that I might, instead, make it a component in something else.

The next thing to try was peyote stitch. I'd learned the brick stitch from the Endless Loom instructions, since the first couple rows have to be done off loom. The thing about peyote beading is that pictures, instructions and patterns for it seem to be everywhere, so I thought I should try to learn it. So far, I'm able to do a pretty good block of solid color, but I'm struggling to follow a pattern since the rows overlap and the direction of the stitching changes with every row, unlike looming.
I used my Beader's Bible (note: this is an affiliate link, if you want to buy this and use this link, I'll get a small commission from Amazon) to learn how to do the basic peyote stitch.

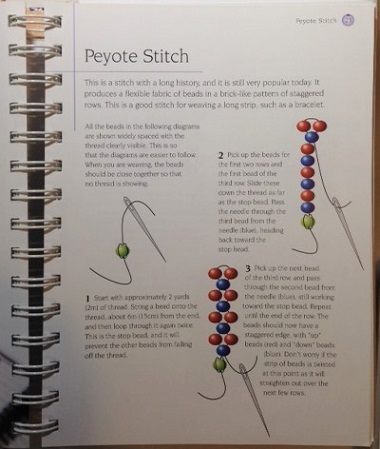
It took a while to get the first couple rows done correctly, that's a bit fiddly with the 11/0 beads in one color. I probably should have gotten some big beads in red and blue, just like the book and practiced with those. I usually pick the hardest way to do something when I'm just learning. 😊 Peyote stitch has each row of beads off-set from the previous one. Like this:

So here's a shot of the first few rows of peyote I've successfully made. I used Miyuki Chocolate brown11/0 beads from Artbeads and Nymo thread, size D in white. (Unless otherwise mentioned, I don't get compensated for mentioning & linking to my sources for beading materials. I just want to save you the time if you want to try something I've done). If your project pattern recommends a certain thread and needle size, choose them for best results.

Also in the picture above, are the tools I would use for any bead weaving project - needle, thread, seed beads, thread conditioner (you can also use beeswax, I believe), sharp scissors, and a beading mat on your work surface - something that keeps the beads from rolling around. In this shot I'm using a Bead Buddy Jr. travel beading board - these are great because you can securely save your work in progress - from cats, bumps, spills and for travel (note: this is an affiliate link, if you want to buy this and use this link, I'll get a small commission from Amazon)
Both sides of the Bead Buddy have the fuzzy-fabric surface. You can find beading mats all over the web and in craft stores, and put them in box lids for a less expensive solution. I guess you could also cut a piece to size out of an old microfiber blanket for a bead mat, and save even more - I haven't got an old one to try with so I haven't used that option personally.
Now my challenge is learning how to read a graphed pattern and work it into the peyote stitch. If I get it right, I'll show you how!
posted by ohdawno at
6:46 PM
![]()
![]()

0 Comments:
Post a Comment
Subscribe to Post Comments [Atom]
<< Home