
Making My Own Embossed Bead Caps, Step by Step
So much going on! My husband and I are in the early stages of buying a house, I'm going on various job interviews and also getting to spend time with my family again.
In the last few months I've finished acquiring the tools needed to make my own beadcaps, but haven't made the attempt - until today. With the Vintaj Big Kick, embossing plates, sheet Vintaj brass, punch cut from Otto Frei, metal dapping tools and metal punch tools all ready to go, I began the process of creating my own embossed bead cap today.
 Step 1
It's all true, too! Anyway, here's the disk with a hole in it. Looks pretty good for something completely handmade.


and I start whacking away with my brass head hammer. Great for stress relief, by the way.

I want to get a bit more curve to the bead cap, so I put it into the next smaller hole and using the corresponding dapping tool, hammer it some more.

Here it is again with a bead and paired up with the 'prototype' cap (the one I forgot to punch before I dapped) - it works fine, but the hole is a bit wonky since I had to re-punch it when my first attempt was way off center.

Now, I figure these two caps probably cost me well over $100 to make since they were the first ones off the assembly line, as it were. Making your own beadcaps is a pricy proposition, at least until you make enough of them to offset the cost of the supplies used in making them, versus buying manufactured ones. But, since I can make them anyway I want with any kind of embellishment or colors or metals, it's more satisfying (and fun!) to create custom beadcaps.Hope you're having a great Friday!

In the last few months I've finished acquiring the tools needed to make my own beadcaps, but haven't made the attempt - until today. With the Vintaj Big Kick, embossing plates, sheet Vintaj brass, punch cut from Otto Frei, metal dapping tools and metal punch tools all ready to go, I began the process of creating my own embossed bead cap today.

Take sheet metal (I used VINTAJ altered blank canvas from Beadaholique) and place in disk cutter (Otto Frei # 125.1734, which comes in a nice wooden box for storage) then hammer with big brass head hammer until the brass is punched through.You now have a round piece of altered brass. Don't do what I did at first and dap it right away (I was too excited to finally use my tools and didn't think ahead). Find the center of the circle - if you're not a perfectionist you can try to eyeball it. If you are a perfectionist, here's a how-to from Instructables. Punch a hole. Depending on what size cap and how you're going to use it, you want to decide how big to punch the hole. I did a rather large one. And I used the huge tool on the left.

I eyeballed it and think I'm close enough to center (whew!) The larger tool really powers through most thicknesses of anything I've been using. I got the tool from Jeanette Blix at Fundametals.net where she said, about the tool,
"EuroPower Multi-Sized Hole Punch! Can you say Muscle? This new Beefy hole-punch has the Power to punch 7 different Large sized round holes ranging from 3/32 up to 9/32" in soft metal up to 16 gauge all in one tool! Let the tool do all the work, the specially designed compound action and hardened cutting dies punch through thick metal with ease, you will not believe what this tool can do until you try it. Hard sided carrying case included. Hole sizes are 3/32, 1/8, 5/32, 3/16, 7/32, ¼ and 9/32"."
It's all true, too! Anyway, here's the disk with a hole in it. Looks pretty good for something completely handmade.

Now it's time to turn it into an embossed bead cap. I used my Vintaj Big Kick with a Deco Embossing plate to give the disk its texture. I position it on the plate over the selected design, put it between the two clear shims and crank it through the machine.

Here's how it looks after it's been embossed:

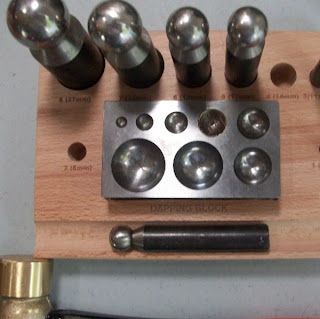
Now it's time to shape it into a dome. I start with the dapping hole (have no idea what the technical name is) that's a bit larger than the disk so it fits inside,


Now it's the right shape, all that's left is a bit of sanding back the finish on the raised areas for contrast and sanding the hole so it won't cut the beading wire or string I use. Voila! The finished cap:


posted by ohdawno at
6:00 AM
![]()
![]()

3 Comments:
HOT!
HOT!
Thanks, Tish!
Post a Comment
Subscribe to Post Comments [Atom]
<< Home